Showing posts with label front yard project. Show all posts

June 24, 2013

Growing Blackberries at Home

blackberries

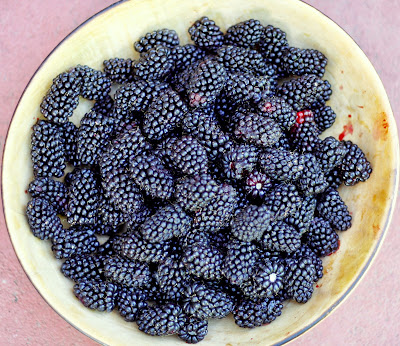
Only a few blackberries are left on our vine anymore. Purple and overripe, they make the porch smell like jam.

We planted them with crossed fingers, not really knowing what to expect. But it turns out blackberries are terribly easy to grow at home. (They grow wild around here too - we recently found a patch over at Pixie Woods).

Watching Alice pluck berries right off the vine and pop them in her mouth has become one of the great pleasures of early summer for me.

blackberry vine

Here are a few things to keep in mind when growing blackberries at home:
  • You probably want to trellis them. Not all blackberries need the extra support, but it's helpful, especially when it's time to harvest. Ours grow along the front porch railing, which is convenient and pretty.
  • Blackberry canes grow one season and then produce fruit the next season. For us, this means we get a year of really abundant berries, followed by a year that's sort of disappointing.
  • They love full sun and well-drained soil and, after the first year, need a lot of pruning.
  • Blackberries are usually planted in December or January, the dormant season. But you could plant a potted vine even now. Space them at least 3 to 4 feet apart. (In my experience, they really take off - you might not need too many).
  • Pick when the berries are dark, dark purple and yield easily. If the berry has even a little red still on it, it's unripe and likely bitter.
  • Be careful. Blackberries have pretty white blossoms that look delicate and sweet. But they can also have monster thorns - make sure little hands don't reach under or inside the vines to harvest.
blackberry pie


I don't know about you, but blackberry pie seems like the perfect summery dessert. I recently shared my recipe with The Record newspaper. Find it here.


We replaced part of our front yard with an edible garden. Read more about it right here.

June 19, 2013

Growing Artichokes at Home

growing artichokes

When we decided to plant a fruit and vegetable garden in the front yard, it was really important to me that the project look intentional and pretty - not like we were trying to farm the front lawn.

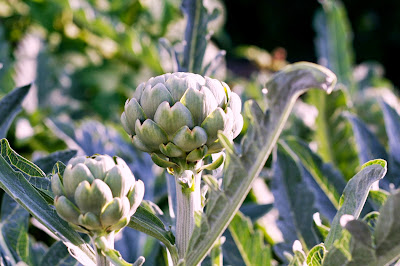
Artichokes seemed like a good pick for us. Their big, silvery leaves and architectural profile - they look a little prehistoric, to be honest - would add beauty and interest to our garden.

We also hoped they would produce artichokes.

So it was disappointing, that first season, when they didn't. I think I know what went wrong: 

Artichokes like cool, foggy summers and frost-free winters - that's why you see so many growing in the Central Coast. In favorable conditions, each stalk will produce one big bud (the part you harvest) and a couple of smaller ones. But when conditions are too hot and dry, the plant won't produce.

Ours needed more water.

We did better this year, growing about 10-12 artichokes between our two plants. We ate them simply - steamed and, once, with honey-mustard sauce.

I'd call it a success.

Here are a few more things to know if you want to try growing artichokes too:

  • Artichoke plants are big - about 3 to 4 feet high and 6 feet in diameter. Give them lots of space.
  • It's a perennial; plants will produce edible buds for about five years.
  • In warm climates like ours, plant in partial shade and water once a week - or even more frequently - during the growing season.
  • Cut artichokes from the stem, an inch or so below the bulb.
  • Harvest when the buds are about 3 inches in diameter, but still closed tight.

Even if you wait too long, an artichoke flower is lovely consolation.

growing artichokes

Fun fact: The entire edible portion of an artichoke bulb is about 50 calories. Ha. After all the work it takes to prepare and eat one, you'd think they'd be more substantial.

We replaced part of our front lawn with an edible garden. To read more about it, go here.

July 16, 2012

Super Easy Garden Apron


An apron is not, by any means, essential to yard work - I know this.

Still.

It's nice to have a convenient place to dust off your hands, and a pocket for holding gloves and clippings and things. Plus, I am convinced that a festive apron can be the spoonful of sugar it takes to make gardening on  a warm day feel like less of a chore. (Because as much fun as it usually is to take care of a garden, it can seem like a chore some days).

These garden aprons, made from dish towels, are super easy - I finished two in about 25 minutes and I bet you could do even better. It might be a fun beginner's project - all you have to sew are two straight lines.

I used a sewing machine, but it wouldn't be too time-consuming to hand sew. Alternatively, I think a blanket stitch around the edges would look adorable, and if you don't want to sew at all, fabric glue would probably work just fine.

You'll need: A dish towel (I got these citrus-y ones at Target); two 30-inch lengths of ribbon (Mine was 2.5-inches wide); sewing supplies.


Step 1: After ironing your dish towel smooth, fold it horizontally (so, short end to short end) with right sides facing inward. It shouldn't be quite in half - make one side extend about 3 inches past the other.

Step 2: Bring the bottom edge of the longer side up to the fold, making a pocket. Right sides should be facing out now.


Step 3: Sandwich your ribbon between the pocket and the apron backing and pin in place. Repeat on the other side.

Step 4: Sew along both side edges of the pocket. To keep things neat, I tried to follow the seams that were on the original dish towel. Tie the ends of the ribbons in knots, and that's it!


Alice wore hers for hours.


July 12, 2012

Food in the Front Yard Project: Growing Cherry Tomatoes


When we said "cherry tomatoes," poor Alice heard only the "cherry" part. She popped one into her mouth, bit down, then looked up at me in betrayed confusion.

And even now that she knows they are not what she thinks they are, the little tomatoes are often too red and too round for her to resist.


In my rookie opinion, cherry tomatoes are super easy to grow in containers. We started out with three nursery-grown seedlings (probably more than a small family really needs) that we caged soon after planting. They like lots of full sunlight and consistently moist soil, and when they are ready to be harvested, they can be twisted off the vine with very little resistance.

Ours have been ripening in phases so that a single bush might have green, yellow, orange and red tomatoes hanging from it - it's very beautiful. One of the challenges of gardening with a toddler, though, is overzealous veggie picking. You can say, "Just the red ones, just the red ones," but sometimes she just can't help herself.


I've never been an enormous fan of tomatoes, but I'll admit it's been nice, in the evenings, to go outside and pick a bowlful of these guys to add to our salads and pastas.

Once, we made little caprese bites, wrapping a cherry tomato and a chunk of mozzarella inside a basil leaf, then skewering it all on a wooden toothpick. Super summery.


We replaced part of our front yard with an edible garden. To read more about it, start with Part 1Part 2, and Part 3.

July 9, 2012

Ladybugs in the Garden


One afternoon a couple of weeks ago,  I found small cardboard box sitting in some shade near the front door.

Inside was a tub full of 1,500 ladybugs.

My father had shipped them, addressed to Alice.

"Can I open it?" she asked.


We decided we would open it after her dad got home from work - directions advised that the bugs would be less likely to fly away if we released them at sunset.

While she waited, Alice carried the container all around the house with her, warning ladybugs, "Don't fall!" and reassuring them, "Don't be scared!"


Garden experts (including local ones) often recommend ladybugs as a natural method of pest control; ladybugs like to eat aphids and other soft-bodied insects that chomp on plants and flowers.

Certainly, we appreciate the benefits. And when we finally lifted the lid from the top of the ladybug tub, it was with fingers crossed that the critters would help keep our edible front-yard garden healthy and strong.


But to say we did it for the garden just wouldn't be true.


As the ladybugs spilled from their container, Alice was overtaken by little-girl shrieks of all-consuming happiness. She screamed when ladybugs crawled onto her dress. She screamed when they flew off the tips of her fingers. It was joyful to an extreme that mid-week evenings almost never reach.

Then the sun went down and it was time to take a bath.


Every once in a while, I see ladybugs for sale at the larger hardware stores in town. If you're looking to buy some - and, if you ask me, you totally should - it might also be worth calling a few nurseries and garden-supply shops. Otherwise, online ordering worked well for us. Here are several sources: Amazon (these are the guys we got), Home Depot,  and Insect Lore. If you know of any others, please let me know!

July 5, 2012

Growing Apricots


The other day, when we were out picking fruit, I asked my husband if he could remember whether we knew, when we bought our house, that the tree in the backyard was an apricot tree, or whether we were surprised to see it blossom that first spring.

(It was winter when we moved in, and the limbs were bare. I don't think we would have known by looking what the tree would become a few months later.)


My husband figures we didn't know it was an apricot tree at first - but that neighbors told us before it blossomed. Now that I think about it, that sounds about right. 


When I was growing up, my grandmother had an apricot tree in her backyard and - always - a stash of apricot jam in her kitchen cupboard. To know how to make jam seemed to me like the height of domestic accomplishment - something I would never do on my own.

But then we had this tree in the backyard, and we had to learn. Even after giving apricots away by the bagful, there was a mountain of fruit left over. Jam seemed like the only option.

It was easier than I thought.


Still, making a batch of jam out of backyard apricots always leaves me feeling like a deeply capable person. 


I sort of love that we inherited from our home this summertime tradition, that it requires the attention of all of us together.

The summer after Alice was born, we brought her outside to nap in the shade under the tree while her dad and I harvested. Now she pulls a chair under the lowest branches and reaches into the leaves to pick apricots herself.

And I hope that, after a while, it'll begin to show her what value there is in making something. Anything. A sonnet or a circuit board. How the process of making something new is a stay against boredom and anxiety and so many other things that have us running into ourselves.


Don't laugh, but entering a jar of jam at the County Fair is quickly rising to the top of my must-do list.

June 25, 2012

DIY: Paper Bag Produce Baskets


The weather turned warm and - it feels like all of a sudden - our little garden has exploded with more fruits and veggies than we can imagine consuming on our own.

I love giving (and receiving!) homegrown goodies, and folding baskets out of paper grocery bags makes for a sturdy, cute and easy way of sharing produce with friends and neighbors.

You'll need: paper grocery bags and scissors

Step 1: Cut out the front or back panel from a paper grocery bag. (If you want a bigger basket, include the side panels in your cut.) Carefully remove any handles.

Step 2: Cut your paper rectangle into a square. Then, make two intersecting creases by folding the square in half across the length and then across the width.

Step 3: Using those creases as a guide, fold in each corner so points meet in the middle.


Step 4: Next, fold the left and right sides in so they meet in the middle. You'll have a long, thin rectangle. Fold each corner down to form points at either end of the rectangle. (Here, you're just making creases. Keep them sharp so folding is easier later on.)

Step 5: Unfold nearly everything so that you have your original square, with just the left and right corners folded in to the center.

Step 6: Using the creases as a guide, fold the left and right sides up, creating two sides of your basket.


Step 7: This part is a little tricky. Where the left side of the basket meets the top flap, there should be a V-shaped crease. Fold that crease in toward the center of the basket. Then repeat on the right side. Doing so will lift the top flap. Fold the flap back down over the V-shaped creases, creating a third side.


Step 8: Repeat on the bottom for the fourth side, and you're done! (Or you could fold a second basket so that you have top and bottom pieces to contain your fruit).


A standard T.J.'s bag gave me a 4-and-a-half-inch basket. For a bigger basket, start with larger rectangle.

June 4, 2012

Food in the Front Yard Project: Blueberries (Plus a recipe for blueberry paletas!)


We're moving into a time of year when blueberries seem to be everywhere: floating on top of your breakfast cereal, scattered in your salad, whirling in your smoothie.

Not until a couple of years ago, though, did I even consider them a California crop - San Joaquin County alone produced 6,400 tons of them (worth close to $24 million) in 2010. Although blueberries traditionally needed a hearty winter chill to thrive, new varieties have been developed to suit warmer regions, including ours.

Blueberries were our gateway to front yard fruit and vegetable gardening. They're definitely pretty enough, with delicate white blossoms. In the fall, their leaves turn gold and bronze, and if you want, shrubs can be trimmed just like hedges.


The local cooperative extension has good resources on growing blueberries at home. My best advice is to fertilize. Blueberries, like azaleas and rhododendrons, prefer acidic soil. Last year we didn't treat the soil. This year we did - and the difference is remarkable.

(If you're not quite ready to grow your own, may I suggest a visit to Giusto Blueberry Farms in Acampo?)


It's so much fun to eat blueberries straight off the bush, and that's mostly what we do. But since the weather has taken a turn for the warmer, I decided to try some blueberry paletas.

Paletas are Mexican ice pops, usually made of fruit. For a real one, go to a big public park some afternoon and listen for the tling-tlinging of a pushcart bell. In the meantime, I thought these came out well.

You'll need:
2 cups blueberries
1 cups yogurt (I used peach-flavored. If you're going with plain, you might consider also stirring in some sugar or another sweetener).
ice pop molds


Step 1. Rinse and drain your blueberries, then puree them. If you want a smoother bar, you could push the puree through a strainer, but I preferred some texture - I even tried to leave some blueberries whole.

Step 2: Stir in yogurt

Step 3: Pour mixture into molds and freeze for 3 or 4 hours, or overnight. (If you have any leftover puree, you can make a single-serving smoothie while you're waiting for the pops to freeze).


That's it!

To read more about how we planned and planted our front yard garden, start with Part 1Part 2, and Part 3.


May 24, 2012

Food in the Front Yard Project: Sugar Snap Peas


(First off. What fun to share our garden in The Record newspaper!

Not only did the piece let me do a little showing and telling about a project our family has really enjoyed, but it also gave an opportunity to draw on the knowledge of some super-insightful garden experts: Ivette Soler, the  designer behind The Germinatrix blog and author of "The Edible Front Yard: The Mow-Less, Grow-More Plan for a Beautiful, Bountiful Garden"; Eric Firpo, who buys and distributes locally grown produce through Stockton Harvest, and who manages both the new Woodbridge Farmer's Market and the Boggs Tract Community Farm; and Jeff Nelson, owner of Port Stockton Nursery, where we've bought many of our veggies and where - here's a fun fact - we took Alice on one of her first-ever public outings. We had her bundled in a Baby Bjorn. So sweet!


There were a few things that all three sources emphasized: 1. If you're new to edible gardening, try starting with herbs. 2. It's not too late - you still have time to put some summer plants in the ground, and 3. It's not too hard. I hope you'll check the story out!)


There's a certain briny smell, my dad has told me, that takes him by the shoulders and leads him back to the memory of a deli he used to visit with his dad - one where they sold pickles out of a barrel.

I guess I'm describing nostalgia here.


For me, anyway, the bright green crunch of sugar snap peas is a strong tug back to summery childhood. I look for them when I'm feeling a little homesick, even.

Nonetheless, I forgot to add sugar snap peas to my wishlist for our new front yard garden.
Thank goodness my husband remembered.


They're really easy to grow - and they grow quickly. Make sure you have a trellis or some other support structure. A few years ago, we grew snap peas in the back yard, but didn't properly trellis them. The plants collapsed on themselves. Such a heartbreaker.


You can eat sugar snap peas pod and all, but Alice prefers to pop open the pod and dig the peas out. I totally get that.


(P.S. We love sugar snap peas right off the vine, but for an easy chicken and snap pea stir fry recipe, check out The Record).


To read more about how we planned and planted our front yard garden, start with Part 1Part 2, and Part 3.
Related Posts Plugin for WordPress, Blogger...